


The hinges were applied to the beams so that one bent left and one bent right, making the 3 pieces form a Z shape. Then it was on to the ribbons.
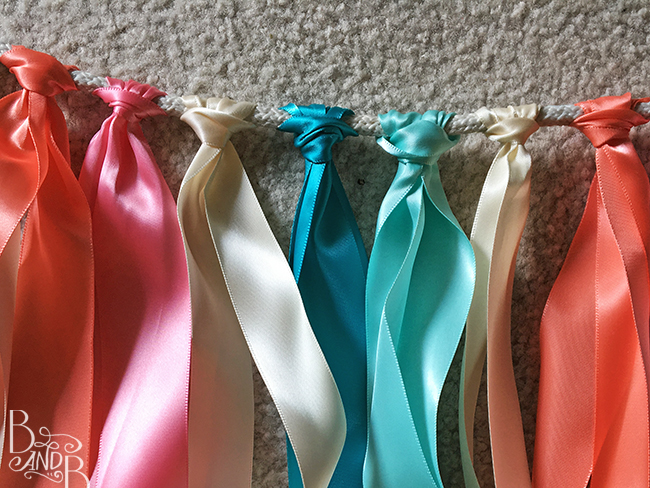
The image above isn’t the ribbons on the actual beams, but it shows the method I used to attach the ribbons to the beams. I wanted to be sure the curtain/backdrop was nice and full. Too thin and it might not be as dramatic as I was going for. So I chose to use a Larks-Head Knot.
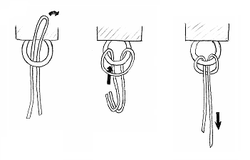
It’s super simple. You fold the full length of the ribbon in half, giving yourself a folded end. Then you place the folded end over the beam and tuck the open end through the loop the fold creates. A handy diagram below shows what I mean better:
Here’s what the curtain looked like once I had 2 of the beams covered.

Erm…. forgive the mess in these photos. If you’re reading this, you’re likely in the thick of a DIY wedding yourself, and should understand the mess. 🙂 (Also, those flower letters, left in photo, we’ve already shared all about here!)
ANYWAY – if you look towards the top of the ribbons, where they’re attached to the beams, you can sorta see how one beam is behind the front one. That’s because of the fancy hinge action. Once the beams were fully covered with ribbon, it was time to carefully pack them away for their trip to the Outer Banks.


The photos above illustrate how that hinging action works. They create a Z, and fold on to each other. To keep the ribbons in order and to prevent them from creasing, I first folded the beams, then slowly rolled the ribbons around the folded beams. I ended up with a messy dinner table, and a very colorful, over-sized roll of ribbon like this:

That doesn’t look too orderly though, does it? And the moment you lift the roll, the slick satin finish will cause the ribbon to unroll itself! What to do! Here’s where Plastic Wrap is your best friend! With help – likely from your future spouse – carefully wrap the ribbon roll in plastic cling wrap until you end up with what looks like an over-sized rainbow taffy roll like this:

This method was brilliant in keeping the ribbons from getting too wrinkled up while we counted down the days ’til our wedding, plus it kept it nice and dry – critical if you’re headed anywhere beachy!
For our purposes we used smaller strands of ribbon to tie the beams to the lattice work in the doorway we were using, but you could also add basic gate locks to the back sides of the hinges (to keep things from swinging) and then create a collapsible frame to hold it up using PVC pipes like Kandy Kreations details on her blog.
So now it was time to decorate!


Stay tuned for the BIG PICTURE of our grand entrance!
~ Beth


2 thoughts on “A Ribbon Backdrop that’s Destination Wedding Approved”
Comments are closed.